

Introduction
Salesforce and Oracle integration using Lightning Connect can streamline your business processes by smoothly connecting data from Oracle databases to your Salesforce environment. This step-by-step guide will walk you through the Salesforce Oracle integration process, from signing up for a DataDirect Cloud trial to syncing external data sources in Salesforce.
Step 1: Sign up for a DataDirect Cloud Trial
Open the DataDirect Cloud trial link.
Click on “Try Now” and provide your personal information.
Activate your account and log in.
Step 2: Download & Install On-Premise Connector
Click on “Connect Data” under the Data Direct Cloud section.
Navigate to the “Downloads” option in the sidebar.
Select the appropriate driver based on your operating system.

Step 3: Create a Data Source
Click on “Connect Data” and then “Data Sources” in the sidebar.
Choose “Oracle” as the data source.

Step 4: Configure & Test Connection
Select On-Premise and enter Oracle EBS instance details.
Find “Connector ID” from the installed connector at “C:\Program Files\Progress\DataDirect\Cloud_OnPremise_Connector_20\OPDH\config.”
Double click on “opconfig.jar” file to configure.

Click on “Test Connection” after configuring.

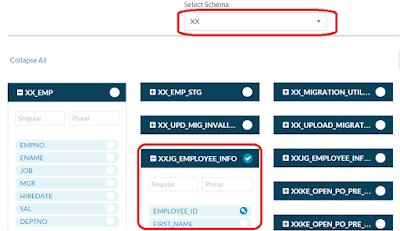
Step 5: Configure Schema
After a successful connection, click on the “Odata” tab for schema configuration.
Click “Configure Schema” and choose your Oracle EBS database schema.
Select Oracle database tables to connect to Salesforce.onfig.jar” file to configure.
Click on “Test Connection” after configuring.
Step 6: Configure & Validate External Data Source in SFDC
In Salesforce.com developer account, go to Setup > Develop > External Data Sources.
Click on “New External Data Source.”
Configure the data source using the provided URL, replacing “Oracle_with_EBS” with your DataDirect Cloud data source name.
Use Basic Authentication, set “Identity Type” to “Per User” or “Named Principal,” and enter DataDirect Cloud credentials.
Click on “Save” and validate the configuration with the “Validate and Sync” button.

Step 7: Sync External Data Source in SFDC
After successful validation, sync the selected Oracle database tables as external objects in Salesforce using the “Sync” button.
External objects will have API Names appended with __x, and fields will be appended with __c.\

Create a new Custom Object Tab for the external object.
Provide field-level security for all external object fields to the system administrator profile.

Note: Data fetched from Oracle is in “Read-Only” mode in Salesforce.
By following these seven steps, you can successfully integrate Salesforce with Oracle using Lightning Connect, providing a seamless flow of data between the two platforms.
Conclusion
In summary, the Salesforce and Oracle integration using Lightning Connect streamlines business processes, offering real-time access to Oracle data within Salesforce. This step-by-step guide ensures a seamless connection and synchronization, fostering better decision-making and personalized customer experiences. To explore how this integration can elevate your business and to initiate the journey towards a more interconnected and data-driven future do contact us.